
A leaf blower fuel line can be replaced at home if the engine is cool, the tank is empty, and the new hose matches the original size and fuel rating. Remove the old line, note its routing, install fuel-resistant tubing and the fuel filter in the correct direction, then check for leaks before starting the blower.
A cracked fuel line can cause hard starting, poor engine performance, fuel leaks, or a strong gas smell. On a two-stroke blower, even a small air leak can also upset the fuel mix and stop the engine from running well.
This guide applies to common gasoline leaf blowers sold in the United States. Always check the owner’s manual for your exact model before removing parts. The tank design, hose layout, primer system, and fuel-line size vary by brand.

What You Need Before Replacing the Fuel Line
Gather the correct parts and tools before you begin. The job is easier when the blower stays clean and the old hose remains available for comparison.
Parts
- Fuel-resistant small-engine fuel line
- Replacement fuel filter, if the old filter is dirty or the line is being replaced as a set
- New tank grommet, if the existing grommet is hard, cracked, or damaged
- New hose clamps, if the blower uses them
- The correct fuel for your model
Use tubing made for gasoline and two-stroke fuel. Do not use ordinary clear vinyl hose, aquarium tubing, vacuum hose, or random rubber tubing. These materials may soften, swell, crack, or leak when exposed to gasoline.
The new line must match the old line’s inside diameter and outside diameter. A line that is too loose may leak or pull off. A line that is too large may not seal at the carburetor or pass through the tank grommet.
Tools
- Flat-head or Phillips screwdriver
- Needle-nose pliers
- Hemostat, long-nose pliers, or a fuel-line pickup tool
- Side cutters or a sharp utility knife
- Clean shop towels
- A small fuel-safe container
- A flashlight
- Safety glasses and fuel-resistant gloves
A plastic fuel-line tool can help pull tubing through a tank opening without damaging it. Avoid using a screwdriver to force the line through a rubber grommet. A sharp tool can cut the grommet and create a fuel leak.
Safety setup
Work outdoors or in a well-ventilated area away from flames, cigarettes, heaters, pilot lights, and electrical sparks. Gasoline vapors can travel across a floor and ignite far from the blower.
Disconnect the spark-plug boot before working near the carburetor or engine. Keep the boot away from the plug. Let the engine cool fully, and place the blower on a stable surface.
How the Fuel Lines Work on a Leaf Blower
Most gasoline leaf blowers use a small fuel tank, a fuel pickup line, a fuel filter, a carburetor, and a primer system. Some models also use a return line from the primer bulb or carburetor back to the tank.
The main fuel line usually carries fuel from the tank to the carburetor. Its tank end often connects to a small fuel filter that rests inside the tank. The filter keeps dirt from reaching the carburetor.
A primer bulb moves fuel through the system before starting. Depending on the design, one line may carry fuel from the tank to the bulb, while another line sends fuel back to the tank. The correct routing depends on the model.
Do not assume that every line is a fuel-supply line. Some hoses are tank vents, impulse lines, or primer return lines. Take a clear photo before removing anything, and compare the routing with the owner’s manual.
Common signs of a bad fuel line
- Fuel drips from the tank or engine area
- A strong gasoline smell appears during or after use
- The blower starts and then stops
- The engine surges or runs lean
- The primer bulb will not fill
- The line looks hard, cloudy, cracked, or loose
- The fuel filter falls off inside the tank
- The line has pulled away from the tank grommet
A failed primer bulb can produce symptoms similar to a bad fuel line. Inspect both parts before buying replacements.

Step-by-Step: How to Replace a Leaf Blower Fuel Line
Follow the steps in order. The most common errors are incorrect hose routing, the wrong line size, and a damaged tank grommet.
1. Empty the fuel tank
Run the blower outdoors until it stops from lack of fuel, if the engine runs safely. Then pour any remaining fuel into an approved fuel container.
Do not drain gasoline into soil, a storm drain, or household trash. Store or dispose of fuel according to local rules. In the United States, many local household hazardous-waste programs accept gasoline.
If the blower will not start, use a hand siphon made for gasoline or carefully drain the tank through the fuel opening. Do not siphon fuel by mouth.
2. Disconnect the spark-plug boot
Pull the rubber boot from the spark plug. Do not pull on the wire itself. This reduces the chance of an accidental start while you work.
Set the boot where it cannot touch the spark plug terminal. Keep the blower switch in the off position.
3. Remove the air filter cover or engine shroud
The carburetor and fuel-line connections may sit behind the air-filter housing or a plastic engine cover. Remove only the parts needed to reach the hoses.
Place screws in a small container. Some screws may have different lengths. Taking photos during disassembly helps you return each part to its original position.
Brush away loose dirt before opening the fuel system. Dirt near the carburetor fitting can enter the fuel passage and cause a second problem.
4. Photograph and label every hose
Take close-up photos of:
- The tank grommet
- The fuel filter
- The carburetor fittings
- The primer bulb connections
- The route around the engine
Use small labels such as “tank,” “carburetor,” “primer,” and “return.” If two hoses look similar, label both ends.
This step matters because primer-bulb systems can look different from one blower to another. A correct hose installed on the wrong fitting may prevent fuel from reaching the carburetor.
5. Remove the old fuel line
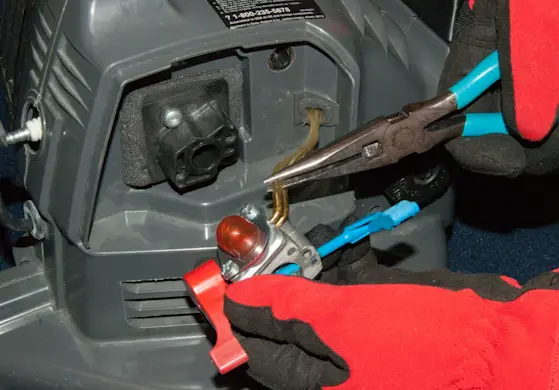
Place a towel under the work area. Pull the hose from the carburetor or primer fitting with needle-nose pliers.
Grip the hose, not the plastic fitting. Twisting or pulling the fitting can damage the carburetor body or primer bulb.
If the hose is stuck, cut it lengthwise near the fitting with a sharp blade. Cut away from your hands and from plastic parts. Do not pry hard against a small brass or plastic nipple.
6. Remove the tank grommet and fuel filter
Many blowers use a rubber grommet where the fuel lines pass through the tank. The grommet may hold one or more hoses.
If the grommet is cracked or hard, replace it. A new hose will not fix a leak caused by a damaged grommet.
To remove the in-tank filter, pull the old line through the tank opening or gently guide the filter out with a clean tool. Do not leave pieces of old hose inside the tank.
If the filter is dirty, replace it. A restricted filter can cause the engine to starve for fuel even after a new hose is installed.
7. Measure the old hose
Cut a clean section of the old line and compare it with the replacement. Measure the inside diameter and outside diameter if the size is not listed in the manual.
Do not choose a line by outside appearance alone. Two hoses may look similar but seal differently at the tank grommet or carburetor fitting.
If the old line is swollen, flattened, or stretched, use the manual or the manufacturer’s parts diagram instead of relying only on the old measurement.
8. Cut the replacement line
Cut the new tubing to match the original length. Make each end square and clean.
A line that is too short may pull off when the engine moves or when the tank is installed. A line that is too long may kink inside the tank or touch hot engine parts.
Leave enough length for the fuel filter to move freely inside the tank. The filter should reach the fuel at normal operating angles, but it should not be trapped against the tank wall.
9. Install the fuel filter
Push the new fuel line fully onto the fuel-filter nipple. If the filter has an arrow, point the arrow toward the carburetor or fuel outlet.
The filter should stay attached when gently pulled. Do not force a line over a fitting that is too large. Use the correct hose size instead.
Some filters are designed to fit only one way. If the filter has no arrow, follow the flow direction shown in the owner’s manual or parts diagram.
10. Feed the line through the tank grommet
Push the free end of the hose through the correct opening in the tank grommet. A small amount of clean two-stroke oil can make the hose easier to install.
Use a fuel-line pickup tool or long-nose pliers to pull the hose into the tank. Work slowly so the hose does not split.
If the hose passes through a separate grommet, install the grommet in the tank before pulling the hose into its final position. Make sure the grommet sits flat and seals around the tank opening.
11. Connect the line to the carburetor or primer bulb
Route the hose exactly as shown in your photos or manual. Keep it away from the muffler, cylinder, sharp edges, throttle linkage, and flywheel.
Push the hose fully onto the fitting. Install a small clamp only if the original design used one or the manufacturer specifies one. An oversized clamp can cut the hose or crack a plastic fitting.
If you are replacing more than one line, replace them one at a time. This prevents confusion between the supply, return, and primer hoses.
12. Reassemble the blower
Reinstall the air-filter housing, engine cover, and screws. Check that no hose is pinched beneath a cover.
Reconnect the spark-plug boot only after the fuel system is assembled and dry. Make sure the air filter is clean and properly seated.
13. Add a small amount of fresh fuel
Use the fuel type and mix ratio listed in the owner’s manual. Many handheld blowers use a gasoline-and-two-stroke-oil mixture, while some newer models use a separate oil system.
Do not guess the oil ratio. A wrong mix can damage the engine or cause excessive smoke and poor running.
Avoid fuel that has been stored too long or left in an unsealed container. Follow the fuel-storage instructions for your blower and the fuel manufacturer’s guidance.
14. Prime and inspect the system
Press the primer bulb according to the starting instructions. Look closely at every connection and the tank grommet.
Stop if you see wet fuel, a growing stain, or a strong fuel leak. Do not start the blower until the leak is fixed and all spilled fuel has evaporated.
A clear or translucent line may show fuel movement, but line color is not a reliable test by itself. The engine must also run correctly under the manufacturer’s normal starting procedure.
15. Start the blower and check again
Start the blower outdoors. Let it idle briefly, then inspect the fuel line and fittings again.
Check for:
- Fuel seepage
- A loose hose
- A kinked line
- A fuel filter that does not move freely
- Engine surging
- Stalling when the throttle opens
- An unusual fuel smell
Stop the engine immediately if fuel leaks near the muffler or cylinder. Let the blower cool before making another repair.

How to Choose the Correct Replacement Fuel Line
The correct replacement line must fit the blower’s fittings and resist gasoline. Model-specific compatibility matters more than color or advertised length.
| Part | What to match | What can go wrong |
|---|---|---|
| Fuel hose | Inside diameter, outside diameter, length, fuel resistance | Leaks, loose fittings, swelling, cracks |
| Tank grommet | Tank opening and number of hose ports | Fuel leaks or poor hose retention |
| Fuel filter | Hose size, flow direction, tank clearance | Fuel starvation or detached filter |
| Primer hose | Correct fitting and routing | Primer will not fill or fuel flows backward |
| Clamps | Correct size and original design | Cut hose, cracked fitting, restricted flow |
Use the manufacturer’s parts diagram when possible. Parts diagrams can show whether your blower uses one line, two lines, a special grommet, or a model-specific filter.
Avoid universal kits that do not list the required hose dimensions. A kit may contain useful tubing but still have the wrong filter, grommet, or primer bulb for your blower.

What to Do If the Blower Still Will Not Start
A new fuel line does not always solve the full problem. Check the fuel path in a safe order.
The primer bulb does not fill
Possible causes include:
- The supply and return lines are reversed
- The fuel filter is blocked
- The line is loose at the tank or carburetor
- The tank grommet leaks air
- The primer bulb is cracked
- The carburetor has an internal blockage
Confirm the hose routing first. Then inspect the filter and each connection. Replace the primer bulb if it is hard, split, or unable to draw fuel.
The engine starts and then dies
Possible causes include:
- A kinked fuel line
- A blocked filter
- A loose line drawing air
- Old or incorrect fuel
- A dirty carburetor
- A blocked tank vent
Check the hose while the blower is in its normal operating position. A line may look fine on the bench but kink when the cover is installed.
Fuel leaks from the tank
Inspect the grommet, hose ends, filter connection, and tank itself. Do not operate a blower with a fuel leak.
If the plastic tank is cracked or the carburetor fitting is damaged, replacement of the affected part may be safer than using sealant. Do not use household glue or non-fuel-rated adhesive on the fuel system.
The engine runs poorly after the repair
Recheck the hose route and fuel type. A line connected to the wrong primer or carburetor port can allow the engine to start but prevent normal operation.
If the line and filter are correct, the carburetor may need cleaning or adjustment. Do not change carburetor adjustment screws unless the manual gives a procedure for your model. Some models use preset or emission-controlled adjustments.
Common Fuel-Line Replacement Mistakes
Avoid these errors because they can create a new fault or a fire risk.
Using the wrong hose
Clear plastic tubing is not automatically fuel-safe. Use tubing labeled for gasoline and small engines.
Guessing the hose routing
A photo and the owner’s manual are more reliable than memory. Primer systems are not universal.
Reusing a damaged filter
A clogged or loose fuel filter can limit fuel flow. Replace it when it is dirty, damaged, or no longer secure.
Installing a line that is too short
A short line can pull on the grommet or carburetor fitting. It may also disconnect when the blower vibrates.
Letting the line touch hot parts
Keep tubing away from the muffler and cylinder. Heat can harden or damage the hose.
Testing indoors
Gasoline vapors are dangerous. Test and run the blower outdoors, away from ignition sources.
Ignoring a fuel smell
A fuel smell after repair may indicate a small leak. Shut down the blower and inspect it before further use.

When to Use a Repair Shop
Replace the line yourself only if you can identify the hoses and work safely with gasoline. Choose a qualified small-engine repair shop when:
- The fuel tank is cracked
- The carburetor fitting is broken
- The tank grommet cannot be removed without damage
- Fuel continues to leak after the repair
- The blower has no spark or has major engine damage
- You cannot confirm the correct fuel-line routing
- The repair requires carburetor adjustment that the manual does not explain
A repair shop can identify the correct model-specific parts and pressure-test the fuel system. Stop using the blower until a leak is repaired.
Frequently Asked Questions
How often should a leaf blower fuel line be replaced?
There is no universal replacement interval. Inspect the line during regular maintenance and replace it when it becomes hard, brittle, cracked, swollen, loose, or discolored. Fuel exposure, heat, storage conditions, and fuel age affect service life.
Can I use a larger fuel line?
Usually, no. A larger line may not seal at the tank grommet, filter, carburetor, or primer bulb. Use the size specified for the blower.
Should I replace the fuel filter at the same time?
Replace the filter if it is dirty, blocked, loose, or attached to the old damaged line. Installing a new filter is often sensible when the old line has broken inside the tank.
Why does the new fuel line keep coming off?
The hose may be the wrong size, not pushed fully onto the fitting, cut unevenly, or damaged by a clamp. A broken fitting or hardened grommet can also prevent a secure connection.
Can I use fuel-line sealant or glue?
Do not use ordinary glue, silicone, or thread sealant on the fuel line. These products may dissolve, release debris, or fail when exposed to gasoline. Replace the hose, grommet, or fitting with the correct part.
Final Checklist
Before using the blower, confirm that:
- The tank grommet is seated correctly
- Every hose follows the original route
- The fuel filter is attached and points in the correct direction
- No hose touches the muffler or sharp edges
- No fuel is leaking
- The correct fuel and oil mix are in the tank
- The air filter cover is secure
- The spark-plug boot is attached
- The blower starts and runs outdoors without a fuel smell
The safest repair is a clean repair with the correct hose, correct routing, and no leaks. If the blower still has fuel-flow problems after these checks, stop using it and have the fuel system inspected by a qualified small-engine technician.